We specialize in hard to find items

All Categories


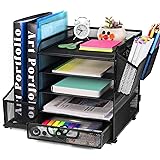
Magazine File Holder Folder Storage Desktop DIY 4 Compartment Standing Hollow Bookshelf Organizer Office Racks Displays Holds Notebooks Documents for School Working Students(Black)
Share Tweet
*Price and Stocks may change without prior notice
*Packaging of actual item may differ from photo shown
- Electrical items MAY be 110 volts.
- 7 Day Return Policy
- All products are genuine and original
- Cash On Delivery/Cash Upon Pickup Available


Magazine File Holder Folder Storage Desktop DIY 4 Features
-
ORGANIZE YOUR BOOKS: desktop bookshelf to keep your books or magazines neat and organized. Size: Approx. 34 * 16 * 18cm / 13.38 * 6.29 * 7.08inch.
-
MULTI SLOTS ORGANIZERS: Multi-slots organizers to hold more books or files in school or office.
-
WOOD MATERIAL: Made of high quality wood, , sturdy and .
-
DESKTOP DECOR: Elegant color and stylish design make it a great decor.
-
EASY TO : Smooth surface, easy to with a piece of damp cloth.
About Magazine File Holder Folder Storage Desktop DIY 4
Specification: Material: Wood Optional Color: #01(Black), #02(Cherry Wood) Size: Approx. 34 * 16 * 18cm / 13.38 * 6.29 * 7.08inch Type: Bookcase Package List: 1 * Book Rack 1 * Bag of Rubber Ring How to install: 1. The book rack consists of A board and a B board. 2. Insert the A board into the B board. 3. Secure the groove with the rings. 4. Pull the ring slightly into the groove on the other side.