We specialize in hard to find items

All Categories


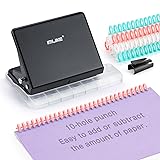
Third Hand Binding Folder Clip And Binding Wheel For Quilting And Sewing By Purple Hobbies, Making It Easier To Create Binding And Store. (Pink Wheel Binding Clamp)
Share Tweet
*Price and Stocks may change without prior notice
*Packaging of actual item may differ from photo shown
- Electrical items MAY be 110 volts.
- 7 Day Return Policy
- All products are genuine and original
- Cash On Delivery/Cash Upon Pickup Available


Third Hand Binding Folder Clip And Binding Wheel Features
-
Enhanced productivity: By using the Wheel Clamp to securely hold your Binding Wheel in place, you will be able to load fabric faster and easier, increasing your productivity and efficiency.
-
There is 1 3/4" of clearance for the clamp to grab your ironing surface, and plenty of clearance to allow you to tighten it onto your ironing board.
-
The clamp fits on the original design of the Binding Wheel , the latest design, and the Mega Wheel.
-
To create your binding, slide the tool off your ironing board and insert a 2 1/2" (or any of the other width choices) strip of fabric into the Third Hand Binding Folder Tool. There is a slot on the top to allow you to use a pin to help pull the fabric through if necessary. Slide the tool back onto the side of your ironing surface. Pull the fabric out about 6" and straighten the edges then press with your iron. Turn the iron tip next to the tool so you can hold the iron with one hand and pull the fabric out with the second. Pull slowly so the iron has time to do its magic and press the seam for you.
-
I roll the binding onto the Binding Wheel as I'm ironing it. Then I can neatly store the binding until I'm ready to stitch it to my project.
-
SEE CONVERSION CHART PICTURE FOR STARTING FABRIC STRIP WIDTH TO ENDING FOLDED FABRIC SIZE
About Third Hand Binding Folder Clip And Binding Wheel
The goal of Purple Hobbies is to share my passions with other makers. We are a small, family owned and operated business. All designs are created by myself and my two sons with patents for both the BladeSaver Thread Cutter and the Magnetic Pin Cup designs. We have lots of hobbies, and the one thing they all have in common is that they can be improved with custom 3D printed objects. See how 3D printing can improve your hobbies and your daily life! All items are original designs created with lots of feedback from family and friends. We use SolidWorks to create the models and then we print them on a "farm" of Ultimaker printers.